Showing posts with label Sewing Tutorial. Show all posts

Sunday 16 November 2014

Pattern Free Cowl Neck Dress

Well I finished my dress this morning so I finally feel like I've accomplished something this week other than work! I made it all pattern free which is what I prefer, some how it is always quicker and things fit better.
Here it is below, I will go through what I did  step by step.

Saturday evening I cut out the pieces for my cowl neck dress, I used a tunic dress that I already have for the shape but I had to fold in the bottom at the sides as I cut it as it was an A-line and I wanted this dress straight.
I also wanted long fitted sleeves so I used a long sleeved T shirt that fits me well to get an idea for the sleeves.
In the picture you can see pins I trace the shape of the neck line by feeling through the original garment and putting pins in place, after I am certain it is correct I cut close to the pins.  I also do this if I need darts or other markings sometimes. no darts in this one as it is so stretchy.

Here I laid on my t shirt with the top of the sleeve to the fold of the fabric, then feel through again and mark with pins the curved shape of the sleeve at the arm hole. Cut around the rest allowing for sleeve hem.  When you have done one place it on the fold of the fabric again and just cut around to get your second sleeve.

Right sides together I cut out the shape for the cowl neck the tunic I used had quite a big cowl but as this is a smart dress I made this smaller. I stitched them down both sides then fold it out so it is the right way, but folded over.

Sew all pieces together, notch sleeve pieces at the top on the fold so you can pin at the shoulder before you sew, if you are using stretchy jersey it is very forgiving when you set in your sleeves any way.
When I sewed in the cowl  I put right side of cowl to right side of dress sewed all around then folded it over to the inside then sewed it there, but you have to do half way around, pull through and do the other half. You  have to leave a little gap for pulling through and finish that bit by hand. ( Sounds confusing but if you have sewn linings in jackets you will get what I mean.)

Here the neck is ok on the dummy but I found when I tried it on it hung funny unless you arrange it as the fabric is quite heavy. I put a jacket on and took it off to test it and the neck was all over the place again. Now you don't want to go out and be faffing around with your collar when you take off your jacket. I knew that would drive me crazy! So I decided I would stitch it invisibly in place catching only the under layer of the cowl. That way if I take off my jacket my collar should survive!  I also did a little stitched fold at the back of the neck as that was the area that was annoying me  the most.

Here it is with a pin in  it while I tested, maybe more of a back v but the messy look was not doing it for me.


Here the neckline had pins in while I hand stitched it on the inside to keep that collar where I wanted it. I think maybe it would have hung better with a different fabric, something more floaty as this fabric stood out quite stiff once it was doubled so maybe that was why I didn't like the effect when it was loose. I will definitely try this neck again but in a different fabric.

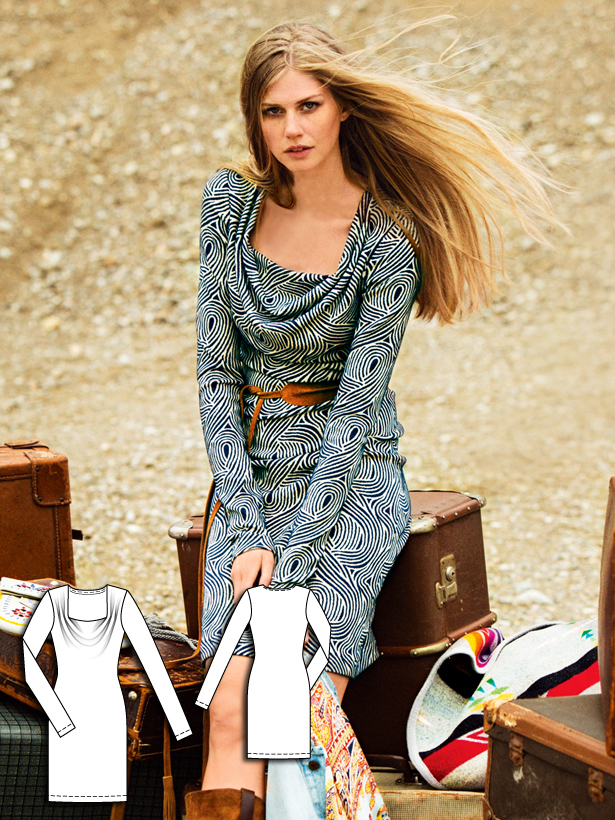
Below is the original dress that gave me the idea, I have noticed that on that one the cowl doesn't continue at the back of the neck also the neck shape was more of a square with a bigger cowl hanging down at the front.  Something for me to try next time.

Sunday 16 March 2014

Fabric Brooch Tutorial

I thought I would show step by step what I did with the fabric scraps I mentioned the other day.  I decided on a brooch and here is how I went about it.
I laid out the shapes I had cut out onto scraps of denim.
Doing this gives the cotton a bit of stability if you just back it in another cotton it is too floppy. When you have the pieces in place zig zag around your shapes neatly ( I find its better to do this first, if you cut the denim out first then zig zag your shape isn't as good)

When you have gone around all your pieces cut them out carefully making sure not to catch any of your stitching. It is best to leave a very fine denim border then you can run your finger along it to make any frayed bits stand out, then gently trim with small sharp scissors.
Now you need to arrange your pieces on the table to see if you are happy with it.  I have backed the orange circle in green felt, looking at it I decided I didn't think the little white button and pale pink fabric did anything for the overall look.  I found a small piece of hot pink felt and a gold button in my sewing box (well two actually) with lots of colours in it.  I decided to add these.  If you like the arrangement you can n ow start to sew the petals on by hand, or machine if you wish.
Keep adding as you go working around a felt circle, I think if you do this by hand you can move it better, also its something you could do while sat watching the T.V. When all the petals are on place your central circles, stitch through using small invisible stitches where your button will go, then securely sew on your button.

Now turn it over and sew on a brooch fastener on the back, I got mine from hobby craft a while ago for £2.40 I think, you get 24 in a pack though so they are inexpensive. I stitched this bit by hand also as you want to make it secure through each of the little holes but don't catch through to the good side. 


I like the way the petals naturally want to curl just as they would on a real flower, you will see what I mean if you have a go.  I have a bag my parents bought me and the buckles keep coming away as they just sloton the bag. I tries this brooch over one to keep it in place and found the colours go perfectly!  I didn't plan that when I cut these bits out the other day. I like it when things work out like that.  Here it is on the bag..
This is the first bag i have used for years that I haven't made myself, it was a gift from my parents but adding this brooch makes it more mine.  I like the splash of colour.


Sunday 9 February 2014

Recycled sweater hot water bottle cover

I mentioned yesterday that I would make  a cover for my hot water bottle like the one I saw on-line, and this week if you are in the shops you will see everything has hearts on it! Now like hearts on  hand made things any way it's a good simple shape to appliqué, but you can be sure that all that valentine themed stuff will be marked down come next week!  I don't tend to fall for all the marketing ploys and if you can sew,stick, carve or draw you shouldn't either! If you must give a gift I think it says more if you put time into it instead of going out and buying some of the mass produced rubbish and this could be taking someone out for a treat it doesn't have to be a thing.
So getting back to the cover, this is not for a gift I just fancied a change and everything I used I already had to hand, so no cost. Here is the hot water bottle, an old sweater too small for my son and a heart cut from some fabric.
If you are unsure about cutting out a heart shape, fold a piece of paper in half, draw half of a heart starting at the fold curving outwards, cut it out and open up. This can be your template before you try it on fabric, use old envelopes to practice on until you get the shape and size that you require.

I just lay the hot water bottle on top of the sweater and cut around it leaving a seam allowance, because the knit is stretchy you will be able to fit the whole bottle through the neck when it's finished.  Sew all the way around except for the top of the neck of the bottle, then zig zag all the way around also to prevent the knit from unravelling.  It is also a good idea to make your stitch quite small.
Here it is finished with the bottle inside, you have to fold the empty bottle in half lengthways to get it through the opening then it just flops out flat. if you are using a non stretchy fabric just use and envelope style opening at the bottom on the wrong side like you would on a cushion.  It will look a bit plumper when full of water.

Yesterday I started reading A Country Doctor's Notebook, I watched the series A Young Doctor's Notebook when it was on Sky Arts and enjoyed it so I though I would try the original stories. I've had it on order at the library and it just came in last week. 
 If you haven't seen the series it is worth watching, it's clever, funny and dark in places.  If you don't have Sky ( which I think has become expensive) you can get the first series from the library for a £1 and lots of other stuff you may have heard about but missed. I think this is much better value, but I don't think my family would give up the Sky even though most of the time there is nothing I'd watch and the stuff I like is usually on the BBC ( apart from the sky arts stuff, ha, ha, but look I could have got it from the library)
I also found a good bargain today in Aldi 
Rose Shloer for 75p!! It's £2.25 in Asda what a difference.  I think  it may be because they are still selling off the odd bits and pieces of Christmas stuff, or has anyone one found it's always this price in there? I have only just discovered I like it as I went to a meal at a friends and I took one from Asda at £2.25  and liked it ( I no longer drink wine, and it appears I should have gone to Aldi that day too!) my friend also likes it and doesn't drink. At the time I also thought it was a bit much for fizzy pop. Any other ideas for when you fancy something nice and non alcoholic to drink? I'm finding if I go out a lot of drinks are too sweet.   Yes I know water is the best thing for you but no way am I paying for bottled water when I go out for a meal, which is not very often, but paying for water, we already do they are called water rates.


Sunday 2 February 2014

Skirt refashion step by step

I was itching to do some sewing this weekend and I have had this lovely piece of fabric with deer on it since before Christmas ( a fat quarter) and I have just used one strip of it on a cushion.  I also had a khaki skirt my mother in law picked up a charity shop for a pound because she said I would use the fabric.  Now the deer fabric is not very big but pretty, the skirt has a nice shape at the top but all pointy handkerchief bits around the bottom which I don't care for.  So I decided I would take most of the skirt away just leaving a sort of yoke at the top ( not sure if that's what you call it but never mind). I then placed my other fabric beneath it and shaped it so it would be 'A' line.

Here is the scary crumpled skirt, I didn't bother ironing it yet, not when I'm going to chop off most of it!


You can see here a lot got snipped away, I did check the length with another skirt to make sure it would be long enough when I added the new piece of fabric.

The fabric is brown with a salmon pink, beige and green deer. I think it goes well with the khaki.
                             Ha! More crumpled fabric this time the slip. It will see an iron, promise.

I also had a green slip dress in a lining that again my mother in law gave me from under a lace dress, I chopped and shaped the bottom of this to make a lining.
I stitched down each side of the new fabric, then laid it right sides together with the original skirt making sure side seams lined up then sewed all around.  I then turned it over and top stitched (number 24 on Toyota machine) so the seams were folded back toward the thicker fabric ( in this case the top of the skirt).
Then I sewed my lining in by turning it  through and just catching on the edge of the existing facing at the waist, I didn't machine stitch down the sides of the zip I did this by hand tucking it under as I went. I prefer to do it this way I think you have more control over how flat it lies.
Now it all got a really good iron and a try on. You can't actually see all of the top of the skirt with the top I'm wearing but who wears tops that short anyway in February in England? I like the colour combination, I also have a salmon pink long sleeved T shit and a brown jumper that would go with this so I'm  sure it will get lots of wear.
So I have managed to make that fat quarter into something wearable and recycled something at the same time.  The only part I may change is the lining, the slip was on the bias so I can feel that when I'm wearing it so it may annoy me, I have some other lining so if it proves to be annoying I will change it as that part is very 
quick to do.

So does anyone out there have any small special bits of fabric that could find their way into an item of clothing.  I have been looking at some of the fabulous bright clothes on the  Desigual site here there are skirts that look like they are made from about three or more different fabrics so lots of inspiration there.

I like this skirt


Sunday 19 January 2014

Fabric covered recycled belt tutorial

I finally got round to covering that belt I mentioned last week with the sarong fabric from years ago. I took pictures of what I did step by step so here they are below.  The colours as always look better in reality as I was losing the light again as I photographed it. I'm not sure about the gold on the buckle though and as there is some metalic craft paint in the cupboard I may change that to silver. My son doesn't like it and said you are not going to wear that are you! well! I know it will look different when put together with an outfit as things always do. Plus it is an exercise in learning to do something with something I didn't want as the elastic on the black belt was looking saggy. I also have enough black belts.

This is the original it's hard to see but the elastic has made it lose its shape

I cut the fabric 15cm longer than the belt, folded it then lay the belt on top I then hand stitched it around the buckle.


I stretched the belt and put pins in place so the fabric would not be too tight when stitched on. I then hand stitched it all the way along.


I machine stitched three rows  of top stitching on the right side while pulling the fabric so it would gather in the elastic. (You will not need to do this if your belt is flat and not elasticated.)
I used a zig zag stitch number 7 on my Toyota machine.
Here it is, it may not be to your taste but you can choose what fabric or style of belt you want to cover.
When I had finished that there was a bit of fabric on my table from a dress I hemmed the other day. It was just wide enough for a headband and I am fed up of my hair going in my face when I wash my face and take off my make up at night so this will come in handy.
I just folded the raw edge in and machine stitched it along, then measure my head making sure it was a bit smaller so it had to stretch a bit ( it is jersey) then sewed up the end.
You could use up lots of bits this way if you have girls to make Alice bands for them, you could add fabric flowers, leaves or a butterfly.
This week I have read Noah Barleywater runs away, with my son.
This is a really good book, it has lots of laughs in it and can seem quite bizarre in places which left us saying 'what?' a lot of the time but we enjoyed it. It is sad too, as you here about why he is running away. I will not say too much but definitely worth a read.
Right I need to go now and do some exercise. Xbox  fit game.


Friday 30 August 2013

Cushion Tutorial - the easy way

Hello I haven't been around this last week as we have been away in our caravan to Somerset and had a lovely week, it stayed dry and was also sunny which doesn't usually happen when we decide to go off somewhere but the weather held out for us this time. I will share some images when I get the chance we only got back this evening so there is lots to do.  I thought I would share some basic instructions for the bright cushions I posted on earlier in the week and those bits of fabric I had left.
First you need to measure your cushion to see what size you need, alternatively if you already have the old cushion cover you can measure that.

Now depending on how many panels you have you need to work out how wide they need to be then add a half inch each side plus an inch to the length for your seam allowance ( it will be a half inch seam allowance throughout).
You could also just play around with your fabric and lay it on, make sure your cushion is covered with enough over hang for seams, sew them all together then make your neat fitting square once you have done this.  This may be preferable for anyone who is put off by adding it all up and working it out, after all the cushion is unique it doesn't have to follow any set rules.

That is what I did in the one above.
You then need to press your seams open, don't skip this bit as it will not look right otherwise.

Then you are going to add a zip, I recycled the ones from the old cushion covers as its always best to use what you have , just carefully unpick, being super careful at the ends as in my case the zipper had already been trimmed and could fly off the end if you are not careful. Pull out all the loose threads.  Lay it on your two  cushion sides which should be facing right sides together, wrong side up facing you.

I mark at each end with a pin as in the photo. Now remove the zip for now, and sew a half inch seam down to the pin stop and reinforce, go down to the other end where the other pin is and sew a half inch seam again up to the edge.

Now you will have a gap with no stitching down the middle, turn your stitch on your machine to the longest length and sew all along between the pins keep it loose don't reinforce as you will be unpicking shortly.

Now open that seam flat, add your zipper foot to your machine, lay the zip down right side facing downwards and sew closely to teeth, you will know where to position it as you have your pins in place still.
Repeat up the other side.

Now you have in your zip but no opening! take your seam ripper or small scissors and release that loose seam up to the reinforced stitching at each end of the zip.  This should have ensured your zip is in nice and even on both sides. You can top stitch at this point if you like on the right side, I didn't in this case.
With right sides together sew all around the cushion using half an inch seam allowance ( did I mention make sure your zip is in the open position first) You now have a nice cushion shape, snip off the corners then zig zag or overlock all around to prevent fraying.
Now neaten all edges, get rid of al those stray threads and turn through. put it on your cushion and admire your work. I know there will be people out there saying I don't do it that way, well that's fine, we all find our own way. Also not all my cushions are made this way, but some are, it's quick. I also use envelope backs, concealed zips, plackets and velcro but that is something for another time.  There may be a lot of photos but this really is a quick way to do it, have a go and let me know what you think.  Here is the cushion below.

The leaf fabric on the cushion is left over from a skirt I made so when I wear it I will be blending in with the furniture! Back soon with some holiday images and great finds from the charity shops there.


What to Let Go

 Hello everyone, so I have mentioned that for memademay I am focusing on remaking and using up fabric scraps.  This has presented me with a ...